Help integrating Outlook with Quantium
This guide provides step-by-step instructions for users who work for organizations that don’t use Microsoft 365 email accounts (e.g. Google Workspace, Microsoft Exchange) but want to integrate their work email with Quantium.
How to create an alias in Outlook to integrate with Quantium
Follow these steps to create an alias on your Outlook mailbox to integrate with Quantium Microsoft integration.
Step 1
Open your web browser and navigate to Outlook.com.
Step 2
Log in to your Outlook.com account using your email address and password.

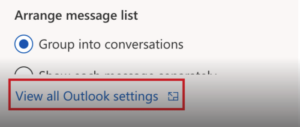
Step 3
Click on the gear icon in the top right-hand corner of the screen, and then select “View all Outlook settings” from the bottom pop out window.
Step 4
In the settings menu, select “Mail” from the left-hand side navigation pane.
Step 5
Under the “Sync email” section, select the dropdown menu underneath “Set default From address”.

Step 6
Select the desired address.
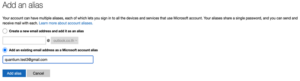
- Note: If this address is not available, click on “Manage or choose primary alias”.

- Select “Add email”.
- Enter the new email address you want to use as your alias and click “Add alias“.
- Select the newly added alias from the drop down menu.

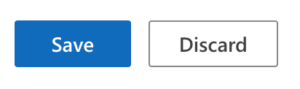
Step 7
Save these changes in the bottom right of the window.
By following these steps, you will be able to create an e-mail alias on your Outlook mailbox and integrate it with Quantium’s Microsoft integration – even if your organization does not use Microsoft 365.